If you’re like most PC guys or gals, you’re all about the computer and not the network, but in order to build and maintain a lab, you really need an internal subnet. It allows for faster, more secure and more robust networking.
Where to start
As with PC gear, the best place to begin is with what you already have — or have already cast off. An old wireless router tucked away in a drawer makes a great DHCP server and four-port hub. Chances are it’s only 100 Mbps, but it’ll definitely get you started.
Here’s a basic configuration that assumes you have a household or lab network with access to the Internet. At home, this is the network you use for your PC, smart TVs, cellphones, Alexa and everything else. This network is already NAT-ed, meaning the router provided by your ISP turns a single wide-area network (WAN) address into a local-area network (LAN) that can handle about 256 devices.
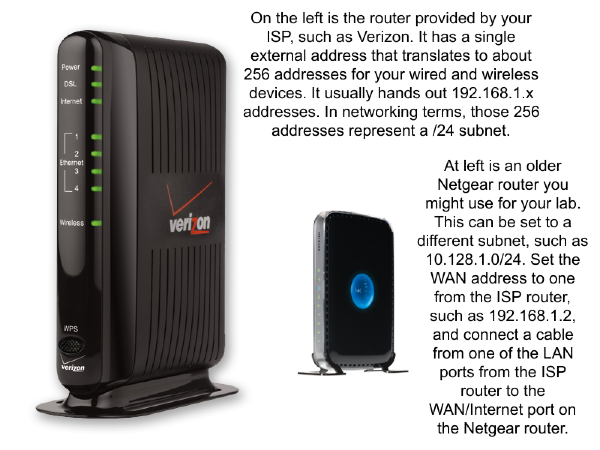
Say the WAN IP address provided by your ISP to your router is 17.200.12.78. That gets translated to something like 192.168.1.x for the devices in your house. If the router itself is at 192.168.1.1, that means all the addresses between 192.168.1.2 and 192.168.1.255 are available for devices. The devices share the bandwidth and access the public Internet via the network address translation (NAT) done by the router.
Chances are this network is kept busy with all your networked devices, so creating a second subnet for your lab is the best way to separate the traffic. You can do this with an old wifi router or switch.
Set up the lab network
Start by resetting the secondary router to its factory defaults. That way you can Google the default IP address and credentials, if necessary. With the device plugged in and powered on, attach a laptop or other PC to one of the LAN ports. To make things simple, disconnect the PC you’re using from any other network and make sure that the network port — such as eth0 — is set up to get an address via DHCP automatically. That way, when you connect it to the router, it’ll grab an address and enable you to login and configure it.
Chances are good that this second router has the same basic subnet as the primary one you use in your house, namely 192.168.1.0/24. That’s why it’s important to not be attached to this device and your house network at the same time.
Log into the device and change the subnet to something like 10.128.1.0/24 and set its address to the first address of that range, 10.128.1.1 in this case. This will be the new address you use to access the secondary router. Reboot it, let it come up and let your connected PC get a new address from it via DHCP. You may have to disable and reenable your network connection (or even reboot) to get an address on the new network.
If you don’t want traffic on this new 10.128.1.0/24 network to reach the Internet, you’re done. If you do, set the WAN port address to a static IP of the first network, say 192.168.1.2, and connect an Ethernet cable from a LAN port on your primary router to the WAN port on the secondary router. Now, devices connected to the 10-net router can access the Internet — even if you don’t connect them via a second network port to your household 192.168.1.0/24 network.
That’s basically all you have to do. If you want this secondary router to offer DHCP addresses, make sure you have that feature turned on. If you want wifi, enable that, too.
See more in the wiki about specific settings and additional tips and tricks.